


What Are Time Tracking Steps?
Setting up time tracking in your web application involves several essential steps to ensure that work hours are logged accurately and efficiently. The first step is to determine the specific requirements of your time tracking system, such as whether it needs to integrate with existing software or comply with specific regulations. Next, you'll need to select a suitable time tracking tool that offers the functionalities you require. Finally, implement the tool within your application and provide training for your team to ensure everyone is comfortable using the new system.
It's important to remember that the choice of a time tracking tool can significantly influence your workflow. For example, industries like healthcare require systems that comply with specific data protection regulations such as HIPAA. According to mordorintelligence.com, the global market for time tracking software is projected to grow significantly, indicating a strong trend towards digital solutions.
Once you've implemented the time tracking system, setting clear usage policies is crucial. Ensure that your team understands the importance of accurate time logging and how the data will be used. This transparency helps in building trust and ensures compliance with legal requirements, such as the Fair Labor Standards Act (FLSA) in the U.S., which mandates accurate record-keeping.
By following these steps, you ensure that your time tracking system is not only functional but also beneficial in increasing productivity and compliance within your organization.
How to Add Time Tracking to Your Web Application
Integrating time tracking into your web application can be streamlined into three fundamental steps. First, assess the specific needs of your application and select a time tracking tool that aligns with those requirements. Next, configure the tool to fit into your existing workflow by setting up user roles, access permissions, and integration points with other software systems. Finally, test the integration thoroughly to ensure it functions as intended and provides accurate data.
The initial step involves evaluating your needs. Consider factors like the size of your team, the complexity of your projects, and any specific compliance requirements. For example, industries with strict regulations, such as construction, benefit from GPS-enabled time tracking for accurate job costing and payroll management.
Once you've chosen the right tool, the next step is configuration. This is where you tailor the tool to match your web application's architecture. Ensure that user permissions are correctly set so that team members can only access what they need. Integration with other systems, such as payroll or project management tools, should be seamless to avoid data silos.
The final step is testing. Conduct a pilot run with a small group to identify any issues before a full-scale rollout. This process allows you to gather feedback, make necessary adjustments, and train your team effectively. According to ontheclock.com, organizations that efficiently integrate time tracking tools often see a marked improvement in productivity, a testament to the value of a well-executed implementation plan.

The Best Way to Track Time
There are multiple methods to effectively track time, but the best approach depends on your specific needs and workflow. Digital solutions, such as automated time tracking apps, have become increasingly popular due to their accuracy and ease of use. These tools eliminate the need for manual entry, reducing errors and saving time. For instance, tools like Harvest and Toggl offer one-click timers and detailed reporting features, making them ideal for businesses aiming to enhance productivity.
Despite the benefits of digital tools, some prefer traditional methods like spreadsheets or paper timesheets. However, these methods are prone to high error rates and can be cumbersome to manage, especially as teams grow. A study mentioned by hubstaff.com highlights that only 17% of individuals track their work hours accurately using manual methods.
For those in creative industries, where flexibility is key, using a combination of project management tools and time tracking apps can be beneficial. This hybrid approach allows teams to manage tasks and track time simultaneously, ensuring that projects stay on schedule and within budget. Industries like software development, which rely heavily on agile methodologies, find these integrations particularly useful for tracking billable hours and resource allocation.
Ultimately, the best way to track time is one that aligns with your business goals and enhances the efficiency of your operations. Consider the specific needs of your industry and team and choose a solution that provides the right balance of ease, accuracy, and integration capabilities.
How to Use a Time Tracking Tool Effectively
Using a time tracking tool effectively requires more than just starting and stopping a timer. To maximize its benefits, you need to integrate it seamlessly into your daily workflow and ensure that it provides actionable insights. Begin by setting clear objectives for what you want to achieve with time tracking, such as improving productivity, optimizing resource allocation, or ensuring compliance with labor regulations.
One practical tip is to regularly review the data collected by your time tracking tool. Analyze patterns to identify bottlenecks or inefficiencies in your workflow. For example, if you notice that certain tasks consistently take longer than expected, it may be worth investigating whether additional training or resources are needed. According to clockify.me, businesses that regularly analyze time tracking data are better positioned to make strategic decisions.
It's also important to customize the tool's settings to fit your specific needs. Adjust notifications to remind team members to log their time and ensure that the categories for time entry are relevant to your projects. This customization not only encourages adherence to time tracking practices but also improves the quality of the data collected.
Finally, involve your team in the process. Solicit feedback to understand how the tool impacts their day-to-day activities and make adjustments as needed. This collaborative approach not only improves adoption rates but also ensures that the tool is genuinely enhancing operational efficiency. By using a time tracking tool effectively, you can gain valuable insights that drive productivity and improve project outcomes.
Digital vs. Paper Timesheets
When deciding between digital and paper-based timesheets, the choice often boils down to accuracy and convenience. Digital timesheets generally offer superior accuracy. They eliminate the risk of transcription errors and make calculations automatically, which can significantly reduce the chances of payroll discrepancies. In contrast, paper timesheets can be prone to errors, especially when transferring data manually into spreadsheets or payroll systems.
Another advantage of digital timesheets is their convenience and accessibility. They can be accessed from anywhere, which is particularly beneficial for remote teams or employees on the go. This is a crucial factor as remote work becomes more prevalent; by 2025, it's estimated that 36.2 million Americans will be working remotely. Digital solutions also allow for real-time tracking and reporting, providing managers with up-to-date insights into team productivity and project progress. According to mordorintelligence.com, the global market for time tracking software is expected to grow at a CAGR of 13.38% from 2025 to 2030, underscoring the increasing shift towards digital solutions.
On the flip side, some industries still rely heavily on paper timesheets due to regulatory requirements or traditional practices. For example, 38% of healthcare companies in the U.S. use paper-based time tracking, often leading to issues like missed punches and payroll errors. This can cause substantial inefficiencies and financial losses. Ultimately, the decision should align with your business needs, considering factors such as the scale of operations, remote work policies, and industry-specific regulations.
Common Mistakes in Time Tracking
Time tracking is crucial for accurate payroll processing and efficient project management, but common mistakes can undermine its effectiveness. One frequent error is not tracking time consistently. Inconsistent time entries can lead to inaccurate billing and payroll errors, which can be costly for businesses. According to hubstaff.com, businesses in the U.S. lose an estimated $7.4 billion daily due to unrecorded work activities, highlighting the financial impact of poor time tracking practices.
Another pitfall is failing to use a suitable system that integrates well with existing workflows. Selecting a time tracking tool that doesn't sync with your project management or payroll systems can create administrative headaches. It’s essential to choose software that minimizes disruption and integrates smoothly with other business tools.
Finally, overlooking employee training and engagement can be a significant oversight. Employees need to understand how to use time tracking tools effectively and recognize their benefits. A lack of training can lead to misuse or underutilization of the system.
To avoid these mistakes, ensure that time tracking is a regular part of your team's workflow and that the tools you select are user-friendly and compatible with other systems you use. Also, prioritize employee training to foster a culture of accountability and transparency around time management.
Best Practices for Time Tracking
Implementing best practices in time tracking can streamline operations and enhance productivity. One effective strategy is to track time daily rather than weekly or monthly. This habit ensures accuracy and allows for immediate corrections if discrepancies arise. According to maxeltracker.com, only 17% of individuals track their work hours accurately, which can lead to significant discrepancies in payroll and project billing.
Another best practice is to automate time tracking as much as possible. Automation reduces manual entry errors and frees up time for more critical tasks. Tools like Harvest offer automation features that can integrate with project management platforms such as Asana and Trello, helping streamline your workflow.
Clear communication about the purpose and benefits of time tracking can also improve compliance and accuracy. Employees are more likely to engage with time tracking when they understand how it benefits both them and the organization. Transparent policies and regular feedback on tracked time can encourage more accurate logging and foster trust.
Lastly, regularly review and analyze time tracking data. Use this information to identify trends and areas for improvement, such as which tasks are taking longer than expected or where resources are being underutilized. By applying these best practices, you can enhance the efficiency of your time tracking processes and ultimately improve your business's bottom line.
How Does a Time Tracker Work?
Time tracking software is designed to simplify the process of recording, managing, and analyzing time spent on various tasks or projects. It typically works by allowing users to log time manually or automatically through features that track activity in the background. This dual approach accommodates different work styles and ensures flexibility in how time is recorded.
Most time trackers start by setting up projects and tasks, enabling users to categorize their time entries accurately. Once set up, users can start tracking time with a click of a button or rely on software to log time automatically as they work. The recorded data is then saved securely, often with robust encryption to protect sensitive information, aligning with data privacy regulations like GDPR.
A practical example of time tracking in action can be seen in industries like software development, where detailed tracking is crucial for billing purposes. Here, time tracking software helps teams bill accurately for hours worked, thus maximizing revenue and ensuring client transparency. According to ontheclock.com, these systems are integral to identifying time-consuming activities and optimizing workflows.
Furthermore, advanced time tracking tools often include reporting features that provide insights into productivity patterns, helping managers make informed decisions about resource allocation and project timelines. The ability to integrate with other business systems like payroll and project management software makes these tools invaluable for maintaining operational efficiency.
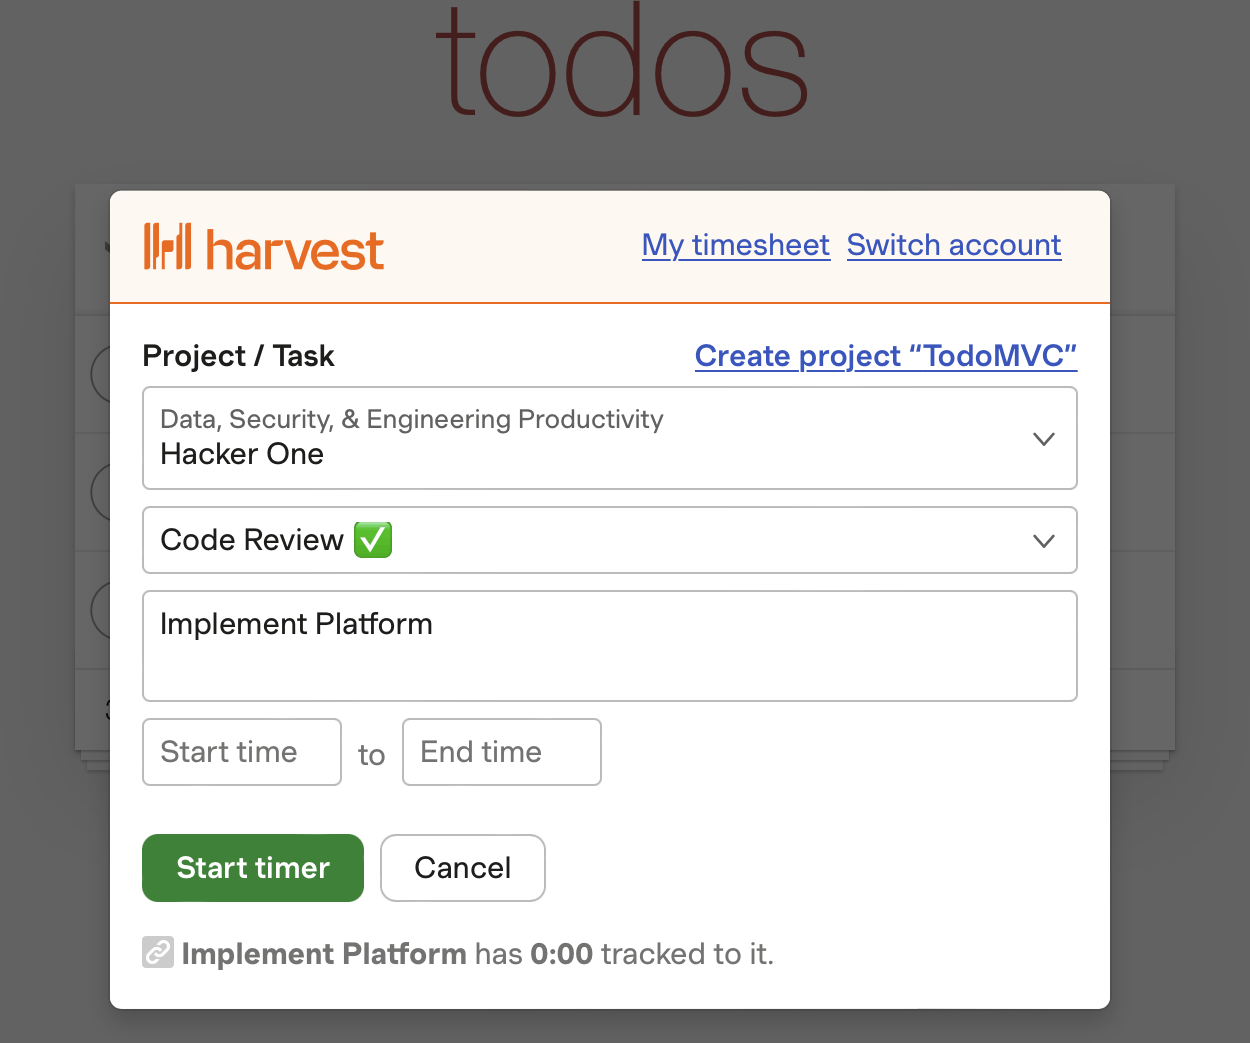
Case Study: Integrating Harvest for Time Tracking
Integrating a time tracking tool like Harvest into your web application can offer significant advantages, as demonstrated by many successful implementations. For example, a creative agency using Harvest saw marked improvements in productivity and efficiency. With its user-friendly interface and robust features, Harvest provided the agency with seamless integration, allowing them to track time across various projects without disrupting existing workflows.
The implementation process, however, wasn't without its challenges. The agency had to ensure that the Harvest API was correctly aligned with their internal systems. This required a dedicated development team to handle the initial setup and customization to fit their specific needs. Despite these hurdles, the benefits far outweighed the setup complexities. The agency reported a 25% increase in productivity, aligning with industry trends that show similar gains for businesses adopting effective time tracking solutions mordorintelligence.com.
One key takeaway from this case study is the importance of selecting a time tracking solution that integrates seamlessly with your existing systems. It's not just about the tool itself but how well it fits into your current processes. Harvest's ability to integrate with numerous platforms like Asana and Trello made it an ideal choice for the agency, reducing the potential for workflow disruption. This seamless integration not only improved time tracking but also enhanced overall project management capabilities by providing real-time data and insights.
For web applications seeking to incorporate time tracking, the experience of this creative agency underscores the importance of considering both the benefits and challenges. While the initial setup may require some investment of time and resources, the long-term gains in productivity and efficiency can be substantial.
Getting Started with Time Tracking in Your Web App
Implementing time tracking in your web application can be a straightforward process if approached correctly. The first step is to evaluate your specific needs and select the right tool that aligns with your operational goals. For many, this means choosing a tool that offers seamless integration with existing systems and provides user-friendly features to encourage adoption.
Once you've selected a tool, it's crucial to focus on the implementation process. A phased approach is often recommended, starting with a pilot program in one department before rolling it out across the entire organization. This strategy allows you to test the system, gather feedback, and make necessary adjustments. According to hubstaff.com, companies often see better adoption rates by involving employees early in the process and providing comprehensive training.
Next, ensure that your time tracking tool is configured correctly. This involves setting up projects and tasks within the tool, as well as integrating it with other business applications like your payroll or invoicing system. This integration can streamline processes and reduce administrative overhead, allowing your team to focus on core tasks rather than manual data entry.
Finally, establish clear policies and guidelines for using the time tracking system. Transparency is key; communicate the purpose of time tracking to your employees and how it benefits both the organization and individuals. By promoting this understanding, you can foster a culture of accountability and efficiency, where employees are more likely to engage positively with the system.
Overall, by carefully planning and executing the implementation of time tracking in your web application, your business can enhance productivity and operational efficiency, while also ensuring compliance with relevant labor laws and regulations.
Frequently Asked Questions
What are the basic steps for time tracking?
The basic steps for time tracking include logging work hours, approving time entries, calculating payroll, and generating reports. It's essential to maintain accurate records for fair compensation and compliance with labor regulations. By implementing these steps, businesses can enhance productivity and make informed decisions based on time utilization.
What is the best method to track time?
The best method to track time involves using a combination of tools like manual timesheets, spreadsheets, and project management software. Regularly logging hours and utilizing calendar systems can also improve accuracy. Additionally, adopting short work sprints and designating a project lead can help streamline the tracking process.
How can I use a time tracking tool effectively?
To use a time tracking tool effectively, start by setting up projects and tasks within the software. Begin tracking time by either starting a timer or manually logging activities as you work. Regularly review your tracked data to identify areas for improvement and ensure that you are maximizing productivity.
How does time tracking software function?
Time tracking software functions by allowing users to record and manage time spent on tasks or projects. Users set up specific projects, then track time either manually or automatically. The software captures activity data, securely storing it for analysis, which aids in productivity assessment and operational efficiency.


